Wednesday 27 February 2013

Dreams make a home

For this weeks Creative Expressions project I decided to get the sewing machine out.
I stamped a piece of cotton fabric with one of the wonderful Art Houses designed by Sam Poole.


I coloured it in using Promarkers then cut around the house. I frayed the edges and then stitched it with a zig zag stitch around the outside of the house. I stitched a straight stitch around the door.


I distressed the edge of the card with Mustard Seed and Barn Door Distress Ink, with a final finish edge of Black Soot. I also did a straight stitch around the card twice.


I stuck the fabric to the card with high tack double sided sticky tape.


I finished off the inside of the card with some Tim Holtz Retro Grunge paper, also edge in the same Distress ink colours as the card. The sentiment is using Tim Holtz Chit Chat words, and I drew a stich pattern around the edge of the words with a black pen.


There's something really homely about stitching on cards, I like it.

******************

It's been a while since I did a Felix update.
We rescued little Felix in August last year.

He's grown up so much since then, even after we snipped and chipped him and he still loves his cuddles, 
the big softee.
Here he is cuddling his favourite toy whilst falling asleep.  
This toy gets the most battering even though its his favourite!


The weather is feeling decidedly more Spring like lately, lets hope it stays that way.
Probably not though knowing our weather.
Michelle xx

Saturday 23 February 2013

Steampunk Embossed Tag

Not only was I excited by the fab Art Houses stamp set that Creative Expressions sent us this month for the design team, but they also sent us this 'Uber' embossing folder by Couture Creations. I love it because it not only has a steampunk feel to it, but it also has a science geometry mapping look to it too, so it has lots of uses and is brilliant for any male themed cards or makes.

I've made a tag with my embossing folder, I wanted that mapping kind of look to it, so I used Tim Holtz's new Travel blueprint stamp set, coming soon to Creative Expressions. I really love the compass and the world stamp in this set. The sentiment is also Tim Holtz stamp from a Visual Artistry stamp set called City Central.

I've distressed the tag with Gathered Twigs, Wild Honey and Mustard Seed distress inks, and it really made the cogs and circles pop. It love this embossing folder, it's very cool.  I've rubbed some Cosmic Shimmers Iridescent Mica Pigments over the top, to highlight the raised areas and some of the stamp.


I made the hanger out of some black florist wire. 


I stamped the compass onto Tim Holtz Kraft Resist paper, and coloured it in with some Distress Markers. I wanted a burnt pirate map type finish on the stamp so I tore holes into the paper and rubbed more Gathered Twigs DI around the edges. I really like the holes, especially where I can see more of the yellow underneath!


I finished off the tag using some of Tim Holtz idea-ology, sprockets, cogs and clock hands.

I've had lots of fun making this tag, really enjoyed making it. There is just something very satisfying about embossing folders, it's just instant art I love it!


I see the snow is back in the North East, and all of my 3 cats are snuggled up to each other on my bed! 
Lazy things, one bit of snow and that's it, sleep time!  

Have a great weekend, thank you to all my new followers, and also to the lovely peeps who pop by regularly. I love reading your comments, I always try to reply, and if I haven't, I'll be round shortly.
Michelle  xxxxx

Thursday 21 February 2013

Journey Journal off you go to Trace

There's been such a buzz in the air about Birmingham's Hobby & Stitch with all the new products that will be available soon to buy. I'm very excited about the new journal style PaperArtsy stamps designed by Sara Naumann, they're going to be such a staple in my collection, I'll be using them all the time.  If you've not seen them yet you can check them out here.

The last time I went to Art from the Heart I was given a 'Journey Journal' which is passed around crafter's to complete a page and then send it to another crafter. It's a brilliant idea. Each page is an envelope, which you have to decorate. This is the journal below.


 You have to include the address page from your envelope and decorate the back of it. The page you decorate is also an envelope, and the theme is journey. I've finished my envelope page which is shown below.

The front of my envelope.

Using PaperArty Fresco Finish Paints and Stampotique stamps.


The back of my Envelope.

Using Hampton Arts, Crafty Individuals and Papermania stamps.
I've also used Tim Holtz chit chat words, which reads "Take time to see the world".


I made a tag to go inside my envelope.

Made this tag using PaperArtsy & Crafty Individuals Stamps.
I still carried on with my travel, journey theme with the stamps. 
I coloured the image using Tim Holtz Distress markers, then distressed all the edges using Gathered Twigs distress ink


I'm sending this off to my crafty buddy Trace Metcalfe for the next crafter to decorate a page.

Hope you're having a good week.
Michelle x

Saturday 16 February 2013

New Awesome Stamps from PaperArtsy

This is a bit of an epic blog post, so if you have time, have a cuppa and a sandwich to hand!

PaperArtsy have been very busy lately making new stamps for their launch at Birmingham's Hobby + Stitch show this weekend.

I'm super excited to show you a sneaky peek of their awesome new stamps which are so versatile and perfect for art journaling as well as lots of other crafty projects.

This stamp set comes under the new EclecTica3 line. This line of stamps has different stamp sets done by different guest designers. The guest designer's stamps I've used here is the hugely talented Sara Naumann and boy are they great! Right up my street for sure.

I couldn't believe my luck when Leandra sent me the whole set, I did a little dance (lying, huge dance!), and got to work straight away!  However I only had a few hours to make as many projects as I could and send them back to PaperArtsy HQ to be taken to Birmingham this weekend.

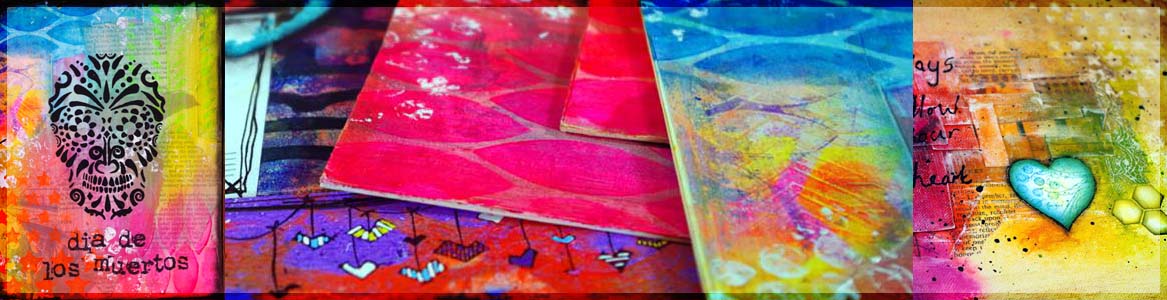
So here are my 4 projects I made below. The first is a painty journal page.

Project No. 1 A Painty Journal page, "Art Journal = Journey"

The background is all PaperArtsy Fresco Finish chalky acrylic paints (perfect for stamping on.). They are: Honey Dew, Beach Hut, South Pacific, Inky Pool, Snowflake & Little Black Dress.


The stamp sets I have used on this project are ESN01, ESN02, ESN03, ESN04, ESN06, ESN08 (sorry no links yet, but they will be available soon on the PaperArtsy website) and Ink and the Dog, Man of Numbers Plate 1.


I used Ranger's Big n Juicy Happy Birthday ink pad on the "art journal = journey" words and Archival black ink on the "anything is possible" stamp. I used Broken China Distress Ink for the numbers from the Ink and the dog stamp set, and I used gold distress stain on the graph lines.
 
I edged the whole page with Black Soot DI and finished it off with black paint on the very edge. 

The dark black lines around the words are achieved by using a water soluble black pencil and a water pen. I love the way the lines cross over each other at the end of the words.


Project No. 2 A Painty Tag, "Play + Experiment"

Again the background is all Fresco Finish acrylic paints, Beach Hut, Inky Pool, South Pacific, Smoked Paprika, Snowflake & Little Black Dress.


The stamp sets I have used on this project are ESN02, ESN04, ESN05, ESN07, ESN08. Also used the paint splat stamp MIN 57 and the crowded circles stamp MIN 41. Love all those MINI stamp sets, cheap as chips and great designs.


I've used black Archival Ink (words & paint splats), gold Distress Stain (text stamp) and Big n Juicy, Happy Birthday ink pad (crowded circles and the film strip stamp). I think I'm addicted to the Big n Juicy ink pads, but they've gone and discontinued them! Typical. I only have the two ink pads too, but I'd love to find the other ones!

Project No. 3 Inky Journal Page, "story time = adventure"

For the background of this journal page I used Dylusions inks, London Blue and Vibrant Turquoise. I just love those bright colours! As you know I'm all about the layers, I love that feeling that the depth of layers always gives you, it's that sense of what's on top of what and what came first. It makes it much more interesting to look at. 


The stamps I used for this project are ESN02, ESN03, ESN05, ESN08 and Hot Picks HPXT01EZ (lines stamp), Hot Picks HP1004EZ (birdcage stamp). 


I've used 2 Crafter's Workshop stencils here, they are: Pointed Circles & Circle Grid. I used the Fresco Finish paints through the stencils.  I used Pea Coat (opaque) and Inky Pool (translucent), love the translucent pointy circles!
I used Mustard Seed DI for the text stamp. and brushed over Very Berry Fresco Finish paint, here and there, over the top of the page when I was finished.

The words are coloured with Dylusions inks in water pens, I used Bubblegum Pink, Sunset Orange, and Pure Sunshine and blended them into each other. They look so vibrant, I love the contrast between the the cool blue's and the hot pink & yellow colours! I edged the journal page with black ink and paint again.


Project No. 4 An inky Tag, "The reason is simple, the reason is Art"

The background is Bubblegum Pink and Sunset Orange Dylusions ink. I love that hit of colour, it's so much more vibrant with the naked eye, the photo's never really give you that sense of the rich colour on here.


The stamps I used for this tag are all the new ones ESN01, ESN04, ESN07, and I whipped out the sewing machine for this one. I love leaving the straggly ends of the threads! (Kate Crane started me off appreciating this little messy tip!)


Wow, well that concludes the epicness of this humongous blog post today, I hope you have survived without  having to read stamp catalogue numbers overload!??

I've been so lucky to have a play with these stamps before they have gone on sale and I can safely say I'll be using these stamps forever because I love them so much! Thank you Leandra and Sara Naumann for making these brilliant stamps. I'm positive you're going to see many more of these stamps appearing in my projects in the future.

It's a fantastically sunny Saturday and I hope you all have a wonderful weekend.
Michelle x

Friday 15 February 2013

Life is wonderful card

I've been out of the loop for a few days with a bad shoulder, but hopefully will be back to full capacity very soon.

I'm all excited too because Hels Sheridan is coming up to the North East in July and I've booked classes. The classes are only 2 minutes away too, bonus! I could even have a gin and craft if I wanted to! lol.....but I won't do that, I'll be good and have wine instead! I'm looking forward to it so much.

Oh I'm also very excited to share with you some fabulous new stamps from Creative Expressions, its the new Art Houses stamp set by Sam Poole. Oh I love em! I've made a grungy painty card below, and used some Shrink Plastic on the sentiment too.

I stamped a 5"x 5" card blank with a text stamp in different shades of brown and a blue Distress inks (DI). I distressed the edges of the card with Gathered Twigs DI.  Then I coloured the house with Promarkers and layered up the roof and the heart....(I'm not saying decoupage, you can't make me!).


I love how the Shrink Plastic works so well on this sentiment! 
I backed it with a little piece of card that I had distressed around the edges with Festive Berries DI.
I edged the top with some white paint too.


I used Tim Holtz Grunge Board elements around the card, using flourishes, the crown, the keys, the wings and the keyhole. I painted them brown (wings cream), then added a little bit of red and finished them off with a little bit of white paint brushed over the top.


Love those Grunge Board keys


Keep your eyes peeled tomorrow for some really exciting news I can't wait to share with you.
Involving new stamps from PaperArtsy
I've been having a play and I'll be revealing all the new designs and 4 projects I've made with them.

Have a great weekend.
Michelle xx

Sunday 10 February 2013

Calendar Journal February Page

I had finished my calendar journal page in time for the beginning of February, but I was thinking of what stamp I wanted on the left and right. I'd seen the inspired by Banksy stamps on the Bee Crafty website ages ago, and really wanted them then. Don't know it took me so long to realise I should just buy them!

I really like graffiti images. I'm a huge fan of Banksy anyway having two of his prints in my house. We've got a great local graffiti artist near us called Karl Striker, I see about 3 or 4 of his pieces on my way to work everyday.

Here is my February page with my two new stamps on it. I've also used my very favourite heart stamp which I love and was free in Craft Stamper last year by Crafty Notions.

If you'd like to join in with the calendar journaling there is a large calendar journaling group on Facebook ran by the lovely Kate Crane and Kate also has a link up on her blog too.


Oh I forgot to say that I used the marvellous Stampotique hanging hearts too across the top. I love these soooo much.


Happy Sunday
Michelle xx

Saturday 9 February 2013

Love is for friends too this loving season!

I can still find a million uses for our amazing stamps we got for Creative Expressions this month. Valentines was the theme with our Hearts Entwined stamp set, but Valentines is not just for our loving other halves, it could also mean an outpouring of love for our dearest friends too!......Maybe a tad over the top saying outpouring......but our friends are always there for us and they should not be forgotten in this loving season!

So here is my statement of affection for my dearest friend using the Special Sentiments stamp set.


I cut a square of pearl card and rounded the corners.
I used an applicator tool and inked up the centre of the card with Seedless Preserves Distress Ink. Then distressed the edges of the card with Gathered Twigs distress ink, on both the pearl card and on my Kraft card.

I had some ink left on my craft mat and did one little spritz of water to make little droplets of colour on the craft mat. I turned over my pearl card with the inked side faced down I picked up some of the droplets of ink and dried them with the heat gun. This produces the lovely mottled ink look. One of Tim's mega great techniques, which I love.


I used a dry brush and brushed over some horizontal and vertical streaks of white paint, just for more added interest and layers. They tuen pink with the ink, and I like that.
I then used a black Adirondack Dabber to edge the pearl card.

I used some blue Maroon Aurora Cosmic Shimmer embossing powder to emboss the heart on kraft card then tore around the edges and distressed with Gathered Twigs DI.
I used Cherry - Ice Stickles glue in the centre of the heart, to bling it up.

I used Creative Expressions metal leaves which are normally a brass colour but I used a silver Distress Stain to change the colour from brass to a distressed silver. Love this! Then I hung a little girl charm on holding a heart.


I shall be popping this one in the post on Monday. Just to let my bezzie friend know she's wonderful!

Have a lovely weekend. 
Michelle xx

Thursday 7 February 2013

Altered Paper Mache Pencil Case for PaperArtsy

Oooh I was caught short with this post, only fifteen minutes late, but better late than never, they say.

I think I'm in love with altering paper mache products, I think my favourite things to alter are the Decopatch  letters, but I had fun changing my favourite colour palette with this pencil case. I went for pinks and dark reds, it has a bit of a Valentine feel to it.

Well seeing as I love my paint brushes, they are now a home for my delicate fine tipped brushes.
To see how I made this pencil case in step by steps, please pop over to the PaperArtsy blog.


This post is my last one for PaperArtsy for February, but I'll be back for the first week in March.
Next time I'll be focussing more on the fabulous PaperArtsy stamps.

In the mean time I've got a canvas planned for the weekend and a couple of journal pages.
Have a lovely evening.
Thank you for all you comments.

Michele x

Wednesday 6 February 2013

Hanging Board for PaperArtsy

I hope you enjoyed last nights post? I was super excited to show you all my altered wooden house.

Tonight's post for PaperArtsy is a paper mache hanging board.
I got the melt pot out for this one.
 I used an interference blue embossing powder, I love the shimmer it gives.


To see my step by step process please hop over to the PaperArtsy blog

I'd love to know what you think of my week so far?
Thank you for taking the time to leave me a comment.
I love reading your comments.

Have inky fun
Michelle xx

Tuesday 5 February 2013

Altered Wooden House Part 2 for PaperArtsy

I hope you liked seeing Part 1 of the altered wooden house yesterday and you've come back to see what happened next?

Well I'm only teasing you here, with some sneaky peaks, you'll have to nip over to the PaperArtsy blog to see it in all it's glory.
Love these rusty wings


I love journaling, and this is my tribute to that.


Some altered Tando Creative butterflies, with Tim Holtz Chit Chat words


I wanted lots of arty elements, but I had to make them from scratch. I made this easel and the painting.


I also made some other arty elements too.


Tim Holtz Grunge Board letters are so awesome painted up, I love them.


Hope you all had a trip over to PaperAtsy to see the whole finished house?
It's one of my all time favourite projects.

Have a great week, I'd love to hear if you make something similar too.
Michelle xxx

Monday 4 February 2013

Altered Wooden House Part 1 for PaperArtsy

This has been a very exciting project for me, I've thought long and hard about the finished result, which will be revealed tomorrow.  As there are so many steps it was better to blog it in two parts rather than having a VERY  long blog post. I'm really looking forward to showing you the finished house though.

Here are just a few pictures of the start of the process, there are many more photo's and step by steps on the PaperArtsy blog. Have a pop over to see all the layers of paint I used and the stamps for the inside.

Tomorrow will be the finished product complete with handmade arty elements to go inside the boxes, and some big rusty wings! I love it!


Hope you're as excited as I am!
Michelle x

Sunday 3 February 2013

Huge Leather Journal Book to fill up

I first noticed this book about a year ago in the furniture shop Michael O'Connor. I thought they were only fake display books not for sale. But they aren't! I noticed that it was full of blank pages and wondered how much they were selling them for.


They're £99!  I had to think about this, I didn't know the integrity of the paper...it felt ok, probably 150-200 gsm, like card. But I didn't know if it would hold up to spray inks, I didn't want the ink to seep through and I didn't want to take the chance and buy an expensive book that may turn out to be useless. So I left dreaming of it being reduced in some amazing sale.


12 months later we went out and I wandered into Michael O'Conner's just to see if they were still there so I could stroke it..... No sale  :(   it was still £99!...... Again I pondered the thought of buying one, and then it occurred to me, well if it's rubbish with inks I can double up the pages and I can paint backgrounds if inks are a problem.


I had talked myself into it. The idea that they might be next in line to disappear off the high street and I might never have this opportunity again to buy this book, swung it for me, before I had time to get my purse out, I was already at the counter with a big smile on my face.

So I had to test it out!


Well how big is it, it's huge! 42 x 29 cm (16" x 11 " inches). It's 7.5 cm (3") thick. Here it is next to Dyan's journal. The cover is all 100% leather, the quality is amazing.


But all that means nothing if the paper is no good for what we need it for.

Well it didn't disappoint!  Yeee ha!


And here is the other side of the page.


There is a little bit of mottling, but I can cope with that.
I think it's a success! I'm going to have a lot of fun filling this up, that's if I ever fill it!

I'm not sure if all Michael O'Connor stores have got this in, but I do know that my local shop has only 5 left. They weigh a ton, and would probably cost a fortune to post, but if anyone wants me to get one for them, then I'm happy to go and get one for you.

It looks like the Never Ending Story book, it's amazing, and the quality is awesome!

Hope you're having a great weekend?
See you later

Michelle xx
Related Posts Plugin for WordPress, Blogger...