Tuesday 30 October 2012

Beautiful Christmas Baubles

These Heartfelt Creations stamps are so beautiful and I'm so proud to be showing you how I've used them for the Creative Expressions Design Team this week. I'll be making crafty projects for November using these baubles stamps and the Creative Expressions "Let it Snow" stamp set too. I'm looking forward to seeing what we all come up with from these wonderful Christmas stamps.

I wanted to show how they look with different colours, and I really like how they've turned out. You can't see the sparkles so well on these pics but they shimmer lots and they look very Chrismassy.


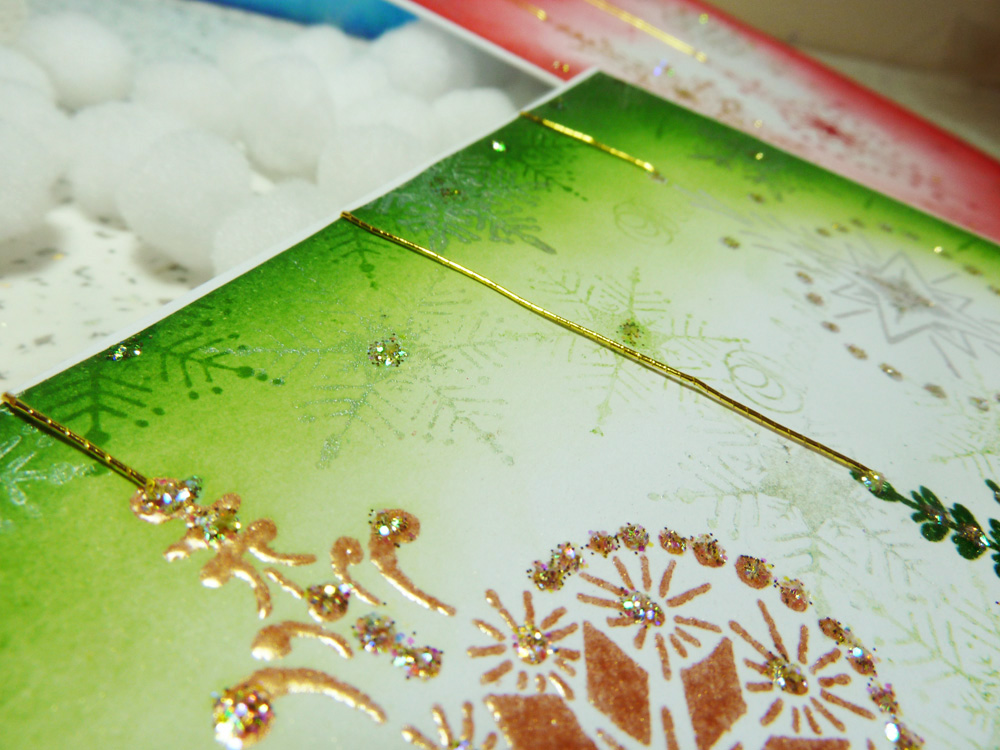
Each card has a coloured centre bauble with the same colour inked around the edge of the card.
I've heat embossed each bauble with a gold and a silver bauble on each card, and then dotted them with the Stickles glitter.

Here's a close up of the gorgeous Cosmic Shimmer Persian Sea Aurora embossing powder, it has mica powders in it, so it has a beautiful metallic shimmer. The gold and the silver are also Cosmic Shimmer's embossing powders.


I've also used some silver acrylic paint which I've stamped onto the cards to add some subtle silvery highlights.


The bauble strings are made with gold cord fed through the eyelets of the baubles.


The inside of each card has the 3 smaller baubles and a Merry Christmas greeting stamped in the same colour as the ink on the front.


I'm well and truly into the Christmas spirit, drinking mulled wine and waiting for Christmas 24 to start on the movie channels! (Christmas films shown 24/7 and starts on the 1st of November).
Is this wrong?
M xxx

Sunday 28 October 2012

Hiding Pumpkin Cats Stampotique card

Well the weather has turned decidedly colder this week and I feel the winter chill fast approaching. It was time to buy the de-icer for the car and fish out my hat and scarf for the cold dark drive to work every morning. The clocks went back last night so the mornings will be lighter, but not for long. I'll be going to work in the dark and coming home in the dark soon, so I'm pleased I have daylight bulbs in the craft room to keep me chirpy through the winter months until Spring arrives.

If I keep making cheeky little cards like this though I'll be a happy bunny until the sunshine is back.

I'm entering this card into the Stampotique challenge this week where you take inspiration from one of their design team members and my inspiration for this card, you guessed it, would be very reminiscent of Kate Crane's style.


I love these Stampotique stamps, the pumpkins just make me smile lots and the cats just look so cheeky.


I love seeing them hiding behind the pumpkins


 I've used Dylusions inks, Stampotique's (pumpkins and cats), TH spider-web, The Stamp Man's spiders and Artistic Outpost's hanging bat stamps. I used Gold Ice Stickles on the spider-web to make it glisten with dew.

This card just makes me feel happy.
Have a great relaxing Sunday.
Michelle x

Thursday 25 October 2012

Friends are like stars....

I made this canvas for my best friend's birthday, we've known each other since going to Uni together. She now lives nearly 100 miles away and I miss her loads, but we try to meet up at least 5 or 6 times a year. So the sentiment on the canvas really sums up our relationship. She's very creative too so I know she'll love this.


I've used the free star stamp we got in Craft Stamper last month and another free star stamp from Craft Stamper from last Christmas I think. There is also another hanging star stamp on here too, not sure who made that one. 


I've used some TH heart and wings dies and some chipboard stars too for some 3D interest!
I used TH Newsprint Letters, covered in acrylic paint.
I've also sneaked in some Beadazzles in little areas here and there.


What canvas wouldn't be complete without a bit of drippage?
This time its Tattered Angels Teal glimmer spray dripping down the canvas.

When you get your eye in, you can see I've used lots of stamps and gesso through stencils and distress ink through stencils too.
You know me I like lots of layers!
Looks like we might see some blue sky today instead of just thick white cloud.
Fingers crossed xx

Tuesday 23 October 2012

Handmade Christmas Wrapping Paper & Tag

Stamps can be used for so many things, it's easy to forget how versatile they can be. When I was thinking about what I could do next with my Tim Holtz Christmas Time stamp set for Creative Expressions I thought about pretty wrapping paper and a tag.  Homemade wrapping paper looks and feels so much better than commercial wrapping paper, and it gives such a unique personal touch too.

I stamped the Santa and the sentiment on TH Kraft Resist paper, coloured it with TH Distress Markers, used red Stickles on Santa's clothes and puff paint on his furry bits! I matted them onto black card and stuck the sentiment to the bottom of the Santa image to make a tag.


I've just used plain parcel wrapping paper and stamped it with the star burst stamps. In the centre of each star burst I've put some red Stickles glitter.


On the top of the parcel I have die cut some TH Tattered Florals and Tattered Leaves from Kraft Glassine, scrunched them up and then distress inked them with, Festive Berries, Mustard Seed & Mowed Lawn.  To give them some festive bling I've rubbed them all with mica powder.


I stamped the star burst stamps all around the parcel.


There is actually a present in there, and my OH wants to know what it is, 
but they're just gonna have to wait!

Michelle x

Saturday 20 October 2012

Fear the Midnight Hour cooked challenge canvas

We've been at it again, challenging each other to make things from the same list of ingredients.
A fab idea we pilfered from the wonderful  Ellen Vargo and Hels Sheridan.
Me & my crafty bud Trace aka inkypinkycraft have been Skyping each other and seeing what we both have in our crafty stash, so we came up with this little list below.  

Here is our list of ingredients
Mini canvas board
Residences Art Parts
Die cuts
Paint
Gesso
Distress Ink
Stamps

Mystery ingredient
Rock Candy

Here is the result of the cooked challenge. A Halloween mini canvas.


The background is mostly a dark blue and when you move it to reflect the light you can see all the interference paint. On these pictures the camera has picked up on all the interference paint, so it looks lighter than it is. I painted Ranger's Rock Candy on the Tree, the pumpkins and the cat!

My cats keep coming in from the garden with those little stickley (seed) balls on them, that I have to pull off every night. Well I used one of those for the door handle! Us crafter's are resourceful if nothing else!


I wonder what delights we come up with next time Trace. 
Can't wait.
Michelle x

Thursday 18 October 2012

Rich Autumn colours inky stamped card

Just a quickie for today. I love Autumn its my favourite time of year, all the leaves are a gorgeous colour and you can use them as stamps or texture too, (a fab freebee that comes in all different shapes and sizes). 

Try it Tuesday has a wonderful challenge on this fortnight of creating something with Autumn/Fall colours and here is my entry for their great theme. It's an 8"x8" card full of rich warm colour .


I used Tim Holtz kraft resist paper as the base and inked it up with Aged Mahogany, Wild Honey, and Mustard Seed Distress inks. I've used a few stamps all Tim Holtz especially the new Blueprint Autumn leaf stamps. I've also used Creative Expressions metal embellishments and a Wendy Vecchi wooden heart.


I'm going to find some interesting leaves at the weekend and make something from them, dunno what yet, but  I'll make something.

Bye for now, Michelle xx

Tuesday 16 October 2012

Golden Arch Evergreen Bough Christmas Card

This is my 3rd make from the Stampers Anonymous Tim Holtz Christmas Time stamp set for the Creative Expressions Design Team. I'm really enjoying being inventive with this fab stamp set. 

This time I've used an arched card which already has a Christmassy feel to it. 


I brushed a Versamark pad across the Tim Holtz embossed 'Merry Christmas' and dusted it with gold Perfect pearls. 

#

I also dusted some music notes while I was on.


I cut a tree and snowflakes die and painted them with white acrylic paint and when they were dry I painted them with Ranger's Rock Candy.  When the Rock Candy was dry I distressed the dies with Evergreen Bough distress ink to show up the cracks.


I used white puff paint on the white furry bits on Santa's traditional green outfit. 


I think this is one of my favourites.
Only 69 days until Christmas Day!
Did you really need to hear that?
Michelle x

PS The inside of the card is really nice too, but forgot to add the picture. 
I will add it when I get home after work tonight. :)

As promised here is the inside.


Sunday 14 October 2012

Ums & Ahs Handmade Journal.

When It's Crafting Time sent me this lovely naked 7 Gypsies portfolio I just knew I wanted to make a handmade journal from it. You can decorate these portfolio's in so many ways, with grungy papers or painty inky messyness. I went for the messyness this time, but I'd like to do another one with grungy papers too. They are great value too only £2.00 for two!

Lots of gesso and texture for an arty journal.


Here is the back where I have used metallic light blue acrylic paint and accented it with streaks of plum purple. I've edged the portfolio with gold acrylic paint.


I used scraps of paper (DCWV citrus) and text from a book and painted gesso over the top. I also added texture using gesso through a Dylusions flower and harlequin stencil, then painted metallic blue acrylic paint over the top. I painted some Tim Holtz Grungeboard letters white and edged them in gold metallic acrylic paint and stuck them on the front of the portfolio once it was dry.


When everything was dry I started to concentrate on the journal pages for the inside. I sewed watercolour card into the spine of the profolio using strong purple tapestry cotton and attached lots of pearls and chain tassels from Tim Holtz Idea-ology range.


Here is a closer look of the pages on the inside of  the journal. I'm looking forward to filling these pages up, especially because I've used watercolour card which will show up colours so well.


I like making handmade journals, there is something really satisfying about it.
Hope you have a great creative crafty Sunday.
Michelle x

Friday 12 October 2012

Wish, Love, Dream inky card

Well I've been feeling sorry for myself this week, been under the weather full of flu, so not much crafting going on at all, the lights have been off and there's tumble weeds in the craft room! So I dusted them out this afternoon and made a card for my friends birthday next week.

I'm in the process of making a canvas for her too. More about that later.

I went all inky and perfect pearls on this card. A very Kate Crane-esk style which I love so much. Totally my cup of tea.


I used Dylusions inks London Blue & Vibrant Turquoise and some gesso through a harlequin Dylusions stencil.  I distress inked an ATC then used a Crafter's Workshop stencil with a baby wipe to bleach out some small squares in the ink. I stamped the Inkylicious Juliana stamp on the ATC and stuck this on the card. The sentiment is Tim Holtz Wish, Love, Dream, stamps.


I used structure gel through a flower stencil and waited for it to dry off a little, then brushed it with red Perfect Pearls. I also used the Perfect Pearls on a text stamp over the inky background.


This is the inside of the card.

I'll be putting up a Halloween mini canvas on Sunday hopefully.
Bye for now xx

Tuesday 9 October 2012

Christmas Time Art Part Frame

This is my second make for the Creative Expressions design team using the Stampers Anonymous Tim Holtz Christmas Time stamp set. I've also used the Mini Holidays stamp set from the same series to mix and match.

The stars and the sentiment are from the Christmas Time stamp set and the crackle stamp and the 3 kings is from the Mini Holidays stamp set.


I heat embossed the stars with white embossing powder and distressed the background using Chipped Sapphire, Salty Ocean, and Weathered Wood Distress Inks. I tore some paper to make hills while I was on.


I made spirals and threaded star charms down the wire. I stuck them to the Arched Frame Art Part with high tack tape.....those bad boys weren't going anywhere stuck to that!


I painted the front of the Art Part frame with gesso, stamped the stars and touched them up with holographic glitter. I used the crackle stamp with some metallic blue acrylic paint all round the frame. I stamped the sentiment onto torn card and distressed the edges, then edged this with more metallic blue acrylic paint.


I love the way the stars dangle on the spiral wires.


I've used a Tim Holtz Idea-ology snowflake on the top and centre.
I also made a hanger from the same blue metallic wire and included a few more spirals for good measure!
The points of the main star were made longer using a white Gelly roll pen


I will certainly be hanging this on my living room door for Christmas.
I love it!
Till next time, crafty peeps xxxx

Sunday 7 October 2012

Preview Day at AFTH and new journal

Art from the Heart (AFTH) is my favourite art shop in Harrogate owned by Dyan Reaveley the creator of the Dylusions inks, stencils and stamps.

I love it when AFTH have a preview day because there's such a buzz in the air. Lots of people and blog friends turn up and we all have a catchup and get inky. I really wish I just lived round the corner. I loved meeting up with Sandra aka RedKittyBcreates, she makes me laugh, and the lovely Ruth too, so pleased she turned up in between classes so we could have lunch together. Mel popped in to say hello too, nice new hairdo Mel.

We had our first class with Kaz Hall, she's such a great teacher. We made a calendar tag using Perfect Pearls mixed with Dylusions inks. I love those giant black Ranger tags......they jumped into my basket though naughty tags......... We finished our class by doing the conga around the shop! 


Our second class was with Kate Crane, with a brilliant idea of a ATC in an arty envelope, It's so gorgeous I love it. I made the big mistake of putting my Stickles glitter on my wings before I had cut them out! Kate rubbed it in because I was being cheeky in class, that's karma I suppose :-) . 


I was running out of time and I forgot to stamp my sentiment and the boy stamp that I wanted for the ATC...oops. So I improvised when I got home. Luckily I had stamped the cats so I used two of them. but added some angel wings to the cat with a heart and drew a tree for him to sit on. The expressions of the cats just make me laugh.

I also managed to grab me one of these!


So I had to get started ASAP, still a working progress though.
I used Kaz's perfect pearls technique on the stars.


I had a great day out again.  
Thanks xx

Thursday 4 October 2012

Hanging Skulls Halloween Canvas

Over at It's Crafting Time blog the theme this week is orange, black and yellow, which immediately shouts Halloween given that it's October. I thought I would make a dark scary canvas, with the hanging skulls and the all seeing eye on the bottom bit.

I don't have a walkthrough on this post, I got carried away and forgot to take photo's. So I started off by doing a base coat of orange paint and then added layers of yellow paint, black Dylusions spray & orange drips.

I've used Tim Holtz tissue tape, Halloween stamps, and the Sizzix Graveyard die. Dylusions harlequin and number jumble stencil. 


I painted the tree directly onto the canvas. I love the way it goes round the side.


I used the Crafters Workshop number stencil on the bottom half with black Dylusion spray. Then I decided to paint in an eye. It looked like there was one there, so I went with it! The letters are from Studio G little wooden alphabet stamps. I love these little stamps. I have loads of them.


Will you be getting dressed up for Halloween?
Michelle xx
Related Posts Plugin for WordPress, Blogger...