Showing posts with label Creative Expressions. Show all posts

Friday, 12 July 2013

Dylusional Doilies for Creative Expressions

For Creative Expressions this week I've used the fab Doily die from Couture Creations. I cut 3 doily's and inked them up with Dylusions inks, Vibrant Turquiose, London Blue and Crushed Grape. I added a few ghosting layers of dots on the doily's too. Then I stamped the flourish stamp from the Floral Silhouette stamp set on the background of the card using Shaded Lilac, Squeezed Lemon and Tumbled Glass Distress Ink. I've stamped the Delicate Asters stamp for the bright yellow flowers in the middle of the doily's.

I'm loving the lovely bright colours, in keeping with our bright hot sunny days. 


It's short and brief this week, as the crafty room is too hot to be in during this weather.
I think I'll be moving some of my crafty stash outside next week, lets hope we get a nice cool breeze soon.
Is this technically a heat wave we're experiencing at the moment, I think so?
Michelle xx

Thursday, 4 July 2013

Great new products from Creative Expressions

This will have to be a short and sweet post as my internet is not working and I’m waiting for an engineer to come out on Saturday. It’s very frustrating. I’m currently tethering my connection from my phone which is very VERY slow.  So here goes....only taken two hours to upload!

For the design team this month Creative Expressions has sent us the gorgeous Doily die from Couture Creations and some fab Cosmic Shimmer texture paste.  I can see that these are going to be well used, they’re great! The texture paste comes in a whole host of colours too, with some metallic ones as well.

In the card below I’ve used the lovely Doily Die, it’s a thin die and works in all die cutting machines.
The sentiment is from the Special Sentiments stamp set from Creative Expressions too.


 Hopefully by next week, we’ll be all sorted and I’ll be back online.
Michelle x

Wednesday, 26 June 2013

Take time to smell the Roses!

I've been mostly out and about this week taking photo's in my local area. I forgot just how gorgeous the countryside is here in the North of England. It's been threatening to rain a few times and the storm clouds make great pictures. 

For Creative Expressions this week I've made this lovely heart wall hanging. 
I've used the roses stamp and the flourish stamp from the Floral Silhouette stamp set.


It's difficult to see very well in this pic but I've also used some Cosmic Shimmer Cast Bronze gilding wax too around the edge. Gilding wax is all the rage at the minute and I love the finish it gives.

I've not been blogging much lately, so sorry about that. I think I did more blog posts when I was working! Now that I am not working I seem to be busier than ever. Job hunting is very time consuming you know.
I've still been crafting a lot though, but my projects are for teaching.
I'll share them on the blog soon though :)

Have a wonderful sunny week, I'll be watching a bit of tennis, tending to my veggie patch and my greenhouse tomatoes and doing lots of craftyness xx 

Thursday, 20 June 2013

Just a note to say you made my day! for Creative Expressions

My make for Creative Expressions this week is a a card. I made it to say thank you to 
a friend of a friend, who let me take pictures of Friesian cows on her farm.
Why you might ask?? Well I wanted to paint a farmyard scene with cows in it, so watch this space.


I love the carnation stamp on the Floral Silhouette stamp set from Creative Expressions, it's one of the many great flower stamps on the set. Here I've used Tim Holtz Distress Markers on the stamp and misted water over the top to rehydrate it. 


Then stamped it onto my watercolour card. I really love this quick and easy watercolour effect.


Here is a close up of the finished flowers along with the flourish stamp which is also on the same stamp set.
I really enjoyed making this card this week.

The sentiment is from the Special Sentiments stamp set also from Creative Expressions. 


Even though the weather is supposed to be taking a turn for the worst from today, the sun is out and I'm happy. Here's a cheeky little cow picture which I took yesterday, they have so much character.


Have a great weekend xx

Friday, 14 June 2013

Life is a tiptoe through the tulips!

I've made a journal page for Creative Expression this week.
I've used the flourish and the tulips from the Floral Silhouette stamp set.

I painted a background of salmon and cream acrylic paint and stamped the lovely flourish stamp around the edge of the page. I added some more layering using a Tim Holtz text stamp, some dots and some black circles.  I stamped the tulips onto white card using Antique Linen Distress ink, so it would not be too dark, when I coloured it in with Promarkers.


I painted the blades of grass on the bottom of the page,and painted the leaves of the tulips too with the same green paint. I really love the way the tulips stand out.

I have my fingers crossed that we're going to get sunshine this weekend..
Here's hoping.
Michelle x

Thursday, 6 June 2013

Fly, Embrace, Believe for Creative Expressions.

I've made a grungy tag this week for the Creative Expressions DT. We've been given a new set of stamps and they're really lovely. They are the Floral Silhouette stamp set, and they have 6 great flower stamps on, two butterflies and a wonderful flourish to boot! A really versatile stamp set I'd say.


I've used lots of products on this one.
First distressed the edges using Iced Spruce Distress Ink, then embossed the tag with the Adagio Couture Creations embossing folder. I then used Broken China Distress Ink to darken the raised musical notes and rubbed Gold Gilding Wax over the top. I've used the flourish stamp too here and there.


I used a Big n Juicy stamp pad on the butterflies stamp, I love those blended colours.
Then I used some Chit Chat words on the butterflies.


I sprayed some Calyso Teal Dylusions ink just for that hit of blue.
I tore up a few pieces book text and distressed the edges and put them on the tag too, along with some white embossing paste.


I attached some straw ribbon with staples and found some lovely blue flower ribbon to put on the bottom. 

 
I'm off to Stamp Magic on Sunday, is anyone else going?
I'll be demo-ing on the PaperArtsy stand.
Have a great weekend.
Michelle xx

Tuesday, 21 May 2013

Delicate Asters for a Special Friend

This month's stamps from Creative Expressions have been such a joy to use, this week I've made a lovely pink card for a special fiend, and those Delicate Asters flower stamps are the perfect simple addition to set this card off. 


I used Picked Raspberry Distress ink around the edge of the card and used Ranger's lovely Adirondack brights pigment ink on the pink flowers and red gold Brilliance ink on the orange flowers.
I used the 'Stamps to Die For' Blossoming Frame with the pink ink and the Sentiment is from the Special Sentiments stamp set from Creative Expressions in the middle of the frame.


I've used a ridge textured card to stamp onto and the Distress ink really shows up the texture around the edges. 
Pigment inks usually get pushed to the back of the drawer these days, but I've enjoyed playing with their bright colours again.
Have a good week.
Michelle xx

Wednesday, 15 May 2013

May sunshine & flowers for my Calendar Journal

I got a little bit behind with my Calendar Journal page this month, but I've been recording my days in a diary until I caught up. If your not familiar with the Calendar Journal revolution, the very talented Kate Crane has a Facebook page where everyone shares their wonderful monthly journal pages.


I've used the fab Delicate Aster's stamps from Creative expressions to make the colourful flowers on the bottom of the page.


I've used Dylusions Inks (Lemon zest, Squeezed Orange, Fresh Lime, Cut grass, cherry Pie) to create the background and also used various stencils to add more interest. 

Then I stamped the Aster's using Archival inks.


I painted the petals with white acrylic paint so it would show up the colour better when using my Prisma colouring pencils. Also this was easier than stamping them on white paper and cutting them all out too.


I've coloured each flower using bright contrasting colours, I love the way the blue just pops out!


Now I can start to fill in my days properly. Actually I have forgotten to put my days of the week on, but I will add them later.

***************
On another note, I've been a little preoccupied lately playing with a new medium for me, oil paints.

I decided to do a still life painting of a few things I had lying around the house and some fresh fruit.


The great thing about oil paints, I've discovered, is that the paint stays wet over a few days so you can change things you don't like all the time. So since I thought I was finished the painting, I've revisited it about 4 times to adjust the shadows and tweak it a little bit.


I only have to wait a month now to varnish it, then frame it.
There's a lot to be said for acrylic paints. However, I really like the feel and smell of working with oils.
I'm looking forward to doing another one, I'd like to include some geology into the next one, so maybe some fossils.  I'm excited!
I've submitted this painting to Paint Party Friday, it's been a while since I did that.

Have a great weekend
Michelle xx

Thursday, 9 May 2013

Bright colourful tag for Creative Expressions.

Well the BBQ went very well on Monday, the sun was beaming and we had great food. Home made chilli burgers, tandoori chicken, focaccia and buns. Plus a nice leafy salad. Yummy. Wish I had taken a photo. I was plied with Prosecco cocktails all afternoon and felt rather delicate the next day. Actually glad there wasn't a photo to be honest!

I was wandering what to make with my lovely flower stamps for Creative Expressions this week and I stumbled upon a page that Kate Crane liked on Facebook. It was a page called Peculiarme71 by a lady called Deb Combs. I really like her digital explosions of colour and it inspired me to make this tag below. So thanks to Deb x

No walkthrough this time, I got carried away and before you knew it I was finished.


I used Creative Expressions Singles Stamps Beaded Swirl, and Damask Heart and the new Heartfelt Creations Delicate Asters stamps. I also used Dylusions Inks, That Special Touch stencils, and white embossing powder for the flowers.


I really love the contrast of the white. 


I'm currently in the middle of doing a large mixed media canvas for a friend, so hopefully it will be finished soon and I can share the process on the blog. Looking forward to handing it over.
The weekend is nearly here, hopefully the rain will stay over the Atlantic, fingers crossed.
Michelle x

Friday, 3 May 2013

Say it with flowers...and chocolate!

Well there is a reason I promise for being so absent from my blog. Once again I've agreed to host a barbecue on Bank Holiday Monday (why do I do it to myself!), I'm hoping that the weather is going to be hot, hot, hot! Last week they were predicting 15oC for Monday and now they're saying it will be 21oC  Oh joy!...OK to some of you, you may think that 15oC is a bit rubbish, but for us Brits that's tropical I can tell you, especially if we have no wind chill going on!  Anyhoo, I've been doing lots of back breaking work in the garden making it look all nice for people coming round. Organising a get together is a great way of making sure all those little jobs you've been meaning to do around the house....get done!  After Monday I'll be able to sit in the garden and just watch my veg and flowers grow over the summer.

Tonight I have made a little gift bag and put some chocolates in. The sentiment on the bag say's "say it with flowers and chocolate". This is so true for me, you're on a winner if you send me sunflowers or lillies, with some Hotel Chocolate! (especially the salted caramel ones!). Sorry waffling again.

I used the new Creative Expressions Heartfelt Creations Delicate Asters mounted stamps. I love these new stamps, I can see them being used over and over again.

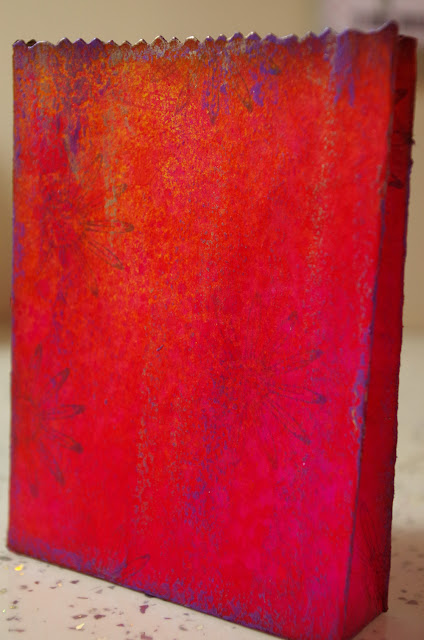
FRONT

BACK

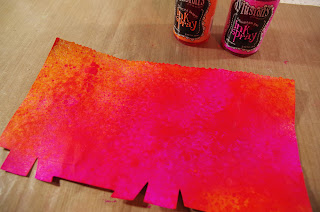
I started off using Dylusions inks Bubblegum Pink and Squeezed Orange sprayed onto a die cut Tim Holtz gift bag.


I folded the edges and distressed them with Gathered Twigs Distress Ink. Then I stamped a few Asters on the background too. Over the top of the background I used Creative Expressions Metallic Amethyst and gold gilding wax, just rubbed on with my finger down the bag.


I love it when the light catches the gilding wax.


I sprayed a sheet of good quality card with Lemon Zest & Pure Sunshine Dylusions Ink and stamped the Asters in different sizes on the card. I cut them out and attached them to my little gift bag. I used some Ice Stickles on the centre of the Asters. I stained a piece of vintage ribbon with the rest of the ink on my craft mat to match the colours of the bag and the flowers. I made the sentiment using a small set of Hampton Art alphabet stamps. Then I did some faux stitching around the edge.


In my little gift bag I put some squares of chocolate. I stamped a square piece of cellophane with the different sized Asters using a pigment dye ink pad. I set the flowers on the cellophane with a heat gun, only gently though, so as not to burn the cellophane.


Maybe we'll play some games on Monday and whoever wins, can have this little gift bag.
But I'm gonna make them work for it!
I've got a lot of catching up to do, so I'll be popping by your blog for a little look at your latest.
Have a great Bank Holiday weekend, make the most of it.
Michelle xxx

Friday, 26 April 2013

Wisteria Framed Door for Creative Expressions


Every now and again I like to get back to basics and get my colouring pencils out. I love this Gothic Gateway door stamp from Creative Expressions. People may already know I have a thing about old doors, as I've mentioned before in previous posts. 


In my own little fantasy world I thought of beautiful hanging Wisteria flowers around the door, but I didn't have a stamp so I just drew them on. I adore the colour against the kraft card.

I've used Prisma Colour pencils, they have very yummy high pigmentation hence the vivid colour, they're a bit pricey but worth it.


I started with the stamp and just a brown pencil


Added some highlight from a white pencil


I drew some branches, and then just coloured in lots of foliage and the flowers.


 I love the blue and the purple together, against the door. 


I know who I'd like to give this to :)


The sentiment is from the Beaded Swirl set from Creative Expressions too.

The weekend is nearly here, and it looks like it's going to be a sunny one, I hope so, I still have so much to do!
Have a good one.
Michelle x

Friday, 19 April 2013

Father's day card for Creative Expressions

Since going to Ally Pally there's been a certain kind of buzz in the air on Twitter and Facebook with all the people we met up with. They're not just words on comments any more, you can see their faces and mannerisms and you feel like you know them that little bit more. I love it, we need more big events so we can meet up more.


Father's day is on the 16th of June this year, and that's not too far away, so I've got ahead of myself and made this grungy painty card. 
I have racks of card stock but I hardly ever use it, I find myself more and more making my own backgrounds with lots of layers, especially when it comes to male themes, it's just easier to make your own. Here's how I made mine.


I started off making a background of brown acrylic paints on good quality card and dried it with a heatgun.
Then I smudged some Vaseline on the dried paint, in vertical strokes, concentrating it on the edges mostly.


Then I painted some cream coloured paint over the top, taking care not to drag the Vaseline. I used the end of my paint brush to make lines in the paint like floorboards.
Wait for the paint to dry, don't use a heat gun or it will melt the Vaseline.


Paint over the top of the cream with some blue paint. When the blue is dry, wipe off the Vaseline with a kitchen towel, to get the distressed paint look.


When all the paint is dry, cut down the paper to the size of your card and start layering the stamps and stencilling for the background.


I've used stamps from Tim Holtz classic collection for the background. I really like the contrast of the white text on the blue and the brown areas.


I finished off the card by putting some Cast Bronze Gilding Wax (Creative Expressions), on my finger and rubbing it on the card in vertical and horizontal movements. Then edging the background with a black Adirondack Dabber.


I really enjoy making my own backgrounds because then they're completely unique.

It looks like the sun has definitely got his hat on this weekend!
I'll be out in the garden doing some much needed weeding, and going for a nice bike ride along the beach. 
Hope you have a great weekend, I wonder what you'll be getting up to?
Take care
Michelle xx
Related Posts Plugin for WordPress, Blogger...